
Advanced Pinball Lamp Controller
Usage Instructions
These instructions assume this is the first time you have configured the board. The process is the same for any changes, but assuming a starting point makes it easier to show an example you can follow along with.
1. Connect the USB cable from the LED OCD board to your PC.
2. Turn on the game.
3. Start the LED OCD application.
NOTE: If you see a message saying that FTD2XX.dll cannot be loaded, it normally means the drivers have not been properly installed. Connect the USB cable between the PC and LED OCD board, power on the game, and complete driver installation before running the configuration program.
4. Select the name of the game you are configuring from the Game Select dropdown menu. If the game you are using LED OCD with does not show up in this menu, a data file needs to be created. The files are in the "data" subdirectory, and you can either create one yourself, or ask us to create it for you. If you do create new files, we appreciate you sending them to us to include in future software releases.

This will populate the names of the lamps in the grid on the left of the screen.
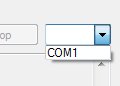
5. If you don't know which port is the LED OCD, you can disconnect the USB cable. Pull down the COM port selection menu and make note of what ports are in the list. These are the COM ports already active on your system.
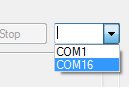
6. Pull down the COM port selection menu again. There should be one new COM port displayed. This is the port that is used to communicate with the LED OCD board. Select it.
7. Press the Connect button.
8. Press the Read button. The current settings will be read from the LED OCD and displayed.
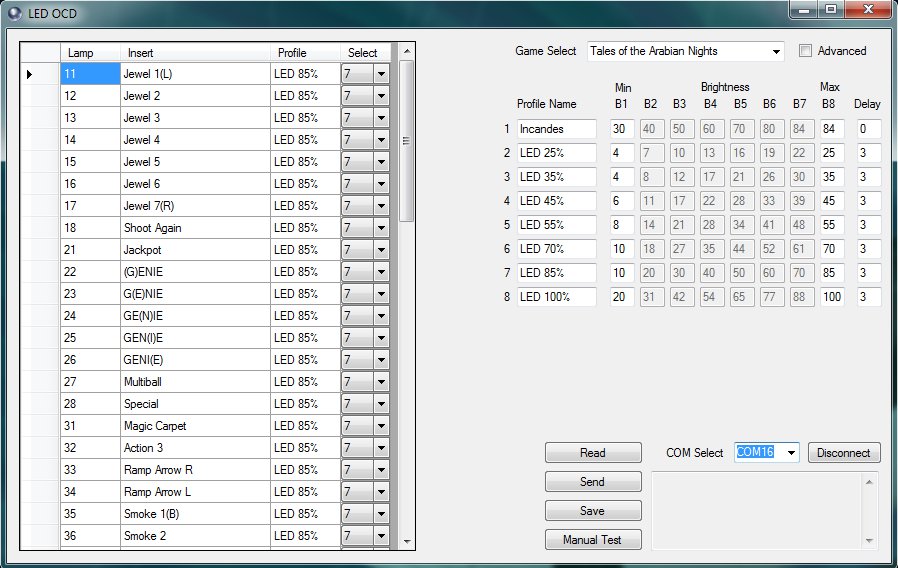
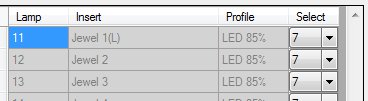
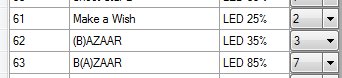
9. Choose a lamp that you want to change to 25% brightness, and select profile "2" from the drop down menu. The profile name will change to the left of the dropdown. Choose another lamp to change to 35% brightness and select profile "3". The numbers you need to select here correspond to the profiles as defined on the right side of the window.
10. Click the Send button. The two lamps you changed will now be lit more dimly.
11. Once all the lamps look like you want, be sure to click the Save button to retain the settings once the machine is powered off.
Modifying Profiles
If the default profiles do not include settings that you are happy with, you can redefine them to make them work better for your setup.
1. Type a new profile name for profile 1.
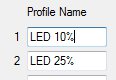
The profile name of any lamps set to profile 1 in the grid on the left will update as you type.

2. Type values for the profile 1 "B#" brightness values and delay. The units of the brightness values are percent brightness. For maximum brightness set B8 to 100, B1 to a low value, and all other "B#" values to something in between. The B2 - B7 values are automatically calculated by default, but if you want to set them yourself, check the Advanced checkbox. There is a LOT of tweaking that can be done here, so you may want to read the section below that fully describes the brightness settings. From my experience, a delay of "3" looks best for LEDs in almost all cases. You're free to experiment, that's the fun part.

3. Click the Send button again, and the lamp that is set to use profile 1 will light using the new settings.
4. Any lamps that should use the same profile, you can select "1" from their dropdown menus.
Brightness Control
Internally, the LED OCD monitors the lamp controls being output by the pinball machine's power driver board. Using this information, the LED OCD automatically determines what brightness the pinball machine is trying to make bulbs appear. In order to make LEDs turn on/off slowly, the LED OCD gradually steps lamps through eight different brightness levels as defined in the lamp's profile.
When a lamp first turns on, it will be at B1 brightness level, so B1 should be a small value, making the bulb light dimly. As the lamp is on longer, the LED OCD will step through B2, B3, etc. These should be set to a slightly higher percentage than the previous B# level so that the bulb gets gradually brighter. B8 is the brightest level, so a steady lit bulb will "top out" at this brightness. If a bulb appears too bright, simply reduce the B# values, and vice-versa.
The delay value determines how quickly the brightness level is changed. The higher the number, the longer the delay between levels. A value of "3" is almost always best for LEDs, but some machines have faster blinking effects that look better at "2".
One thing to watch out for is ghosting (a LED that is dimly lit when it isn't supposed to be). This happens due to complex timing issues that are affected by the types of bulbs in the machine. One of the worst cases is when an incandescent bulb is in the same row and previous column as an LED and the brightness of the incandescent bulb is high. For example, lamp #35 is incandescent, lamp #45 is LED, and lamp #35 is set to 100% brightness. You will almost always see ghosting in this case. To eliminate it, you can change the maximum brightness of lamp #35 (around 84% seems to be the sweet spot) or replace lamp #35 with an LED.
Different types of bulbs also react differently. Non-ghosting type LEDs often will not light at all until around 40% brightness, while simple bulbs can light at around 4%. Like I said earlier, there are a LOT of changes you can make.
Manual Test
Since it can be difficult to see what a lamp looks like at a particular brightness while it is constantly changing, it is useful to be able to force bulbs to remain static. This is what the manual test allows you to do.
1. Click the "Manual Test" button. Additional controls will appear on the LED OCD configuration window, and all the pinball machine lamps will turn off.
2. The first row of new controls include two dropdown menus that can be used to force a lamp to change to and remain at a brightness level. Select a lamp from the first menu and a level from the second menu, then click Send. The lamp may not light yet, since all the brightness values are still set to zero.
3. The second row of new controls are used to set the brightness percentage of each of the eight brightness levels, just as in the standard controls. Enter the percentages you want to test, then click the "->" button. The lamp you changed in step 2 should now light and remain steady.
4. Repeat steps 2 and 3 to change lamps as you see fit. A couple of very useful tests are to set a lamp to brightness level 1, another to level 8, and try different percentages to figure out what maximum and minimum values look good to you.
5. Once you have a modified set of brightness percentages you want to keep, you can transfer them to one of the profiles. The third row of advanced controls has a dropdown menu to select which profile the values will be transferred to. Click the Keep button to transfer the values.
6. Finally, the Reset button can be used to return all the lamps to brightness zero (off).
7. When you are finished with the advanced controls, click "Game Control", and the manual test controls will be hidden once again. Control of all lamps will also be returned to the pinball machine.
Advanced Configuration Example - Stern Spider-Man
First, the machine had a full treatment of Ablaze Ghostbuster LEDs. They have additional circuitry in them to prevent them from turning on in low current and/or short pulse conditions. This also causes them to not turn on when set to low brightness settings with LED OCD. It's the same with CT Premium bulbs.
When we first added the OCD board, and turned the machine on, attract mode was not very impressive. By default, the bulbs are set for the following brightness ramp:
10 20 30 40 50 60 70 85
Testing them using the manual test method described above, however, showed that the lamps did not turn on at all until about 22%, and were flickery up to about 40%. This caused the default settings to be rough and flickery since the low end brightness values did not work well with the GB LEDs. I changed the ramp to:
40 46 52 59 65 72 78 85
This was much better, but a bit dim, so I increased the top end of the brightness ramp making it:
40 48 57 65 74 82 91 100
Short of a few bulbs that could still be brighter, attract mode now looked pretty good. Remember these were Ablaze GB, and brightness is really not their strong point.
Once we started lighting the Villain inserts, there was still some mild flicker. I needed to find out which output brightness levels were being used for each of the Villain mode levels. With Green Goblin at level 1, I checked the Advanced checkbox in the configuration software and changed the LED OCD ramp to:
100 0 0 0 0 0 0 0
Since this didn't light at all, I knew B1 was not being used at all at level 1. Changed to:
0 100 0 0 0 0 0 0
This caused the lamp to flicker, so B2 *is* being used at level 1. I continued this process to map which output levels were used at level 1. We advanced GG to level 2, repeated the process, ... Finally, we had the following mapping:
Villain Level 0 - OffVillain Level 1 - B2 & B3
Villain Level 2 - B5 & B6
Villain Level 3 - B8
In order to have a dimly lit Villain insert be steady, the B2/B3 pair needed to set to the same value, as well as the B5/B6 pair. I changed the ramp to:
40 48 48 60 75 75 90 100
The flicker in the Villain inserts was gone, but you really couldn't tell a difference between a dimly lit (Level 1) and fully lit (Level 3) insert. I played with it some, but there wasn't much I could do. The low end being limited to a minimum of 40% really limited what I was able to do. This same ramp turned out to be appropriate to avoid strobing on the 2X bonus white arrow insert.
We also put a couple of Ablaze 3-LED bulbs in Green Goblin and Doc Ock, and I was able to reduce the low end to 10% without flicker. This allowed me more flexibility in separating the brightness of each mode level, but you'd still be hard pressed to tell between Level 2 and Level 3.